Apple wine technology. The correct technology for making homemade wine from apples
Anyone who does not have large vineyards, but loves wine, can make it from ordinary apples. The result is a very tasty drink, which in small quantities only benefits our body. Making apple wine at home is a fairly simple process that even beginners can do. It is worth noting that many people like this drink, and your guests will be satisfied after tasting it.
Choosing raw materials for apple wine
To make homemade wine, you can, in principle, use almost any berries and fruits. However, the ideal raw materials for this drink are grapes, pears and apples. This is due to the fact that some fruits contain very little sugar and a huge amount of acid. Wine made from the pure juice of such berries and fruits ends up being very sour and slightly alcoholic. Grapes and apples have the ideal composition for preparing this drink. You can make wine from fruit juice. However, it does not need improvement or correction.
Today, more than one recipe for apple wine is known. The drink can be prepared as dessert, table, strong, liqueur, simple, or with the addition of yeast. If you are just taking your first steps and don’t know how to make homemade apple wine, then you should start with liqueur, dessert or strong wine. After all, when preparing these varieties, they do not require the most complex equipment and are easier to tolerate inept and rough handling. It's no secret that the ability to make dry and light wines comes with experience. And you may not get a good drink the first time. Making apple wine at home has certain difficulties.

What do you need to make wine from apples?
So, how to make homemade apple wine? First of all, you should prepare everything you need. To do this you will need:
- Plasticine and a small plastic tube. All this can be replaced with a medical glove.
- Several sealed containers. One is needed for fermentation, and the second is for settling the wine.
- Special equipment for making juice.
- The apples are ripe.
- Sugar.
To make simple apple wine, any variety of red, yellow, or green fruit will do. Can be used both summer and winter. The main thing is that the fruits are fully ripe and, of course, juicy.
Preparing the apples
Fruits collected from the ground or picked from trees do not need to be washed. After all, yeast lives on their surface, which will bring considerable benefits in the future. Especially if you are planning to make apple wine without yeast. If the fruits are too dirty, they can be cleaned with a clothes brush or simply wiped with a dry cloth.

Many novice winemakers complain that the finished wine has a bitter aftertaste. To avoid this, remove the core and seeds from apples. If the fruit is slightly damaged, then it is worth cutting out all the rotten areas.
Juicing
Making apple wine at home begins with processing the fruit. The juice should be squeezed out of them. For this, of course, it is better to use a special unit - a juicer. Only in this case the raw material turns out to be clean and practically free of pulp. This greatly simplifies the further preparation of the drink.
If you don’t have such a kitchen tool, you can use a mechanical grater. As a result, you should get a puree that needs to be squeezed out. This can be done using regular gauze. Of course, the process is labor-intensive, but in the end you should end up with at least a liquid puree. Only in this case will you have a chance to create your own apple wine, the preparation of which takes a lot of time.
The juice must settle
The apple wine recipe is really simple. Liquid puree or juice must be placed in a container with a fairly wide neck for several days. To do this, you can use a barrel or a large pan. During this time, wild yeast gets into the drink. As a result, the mixture should decompose into several fractions: regular juice and pulp, which collects at the top. In order for the yeast to get directly into the raw materials, the mixture must be stirred up to 4 times a day for several days with a wooden device or with a clean hand.
After three days, the pulp should form a dense layer on the surface of the juice. You need to remove it using a colander or a saucepan. As a result, pure juice should remain in the container, as well as a small layer of pulp up to 5 millimeters thick. This stage can be considered completed. The first signs of fermentation are the characteristic hissing and vinegar-alcohol aroma. We can consider that making apple wine at home has begun.

Important Ingredient: Sugar
It’s hard to imagine homemade apple wine, which takes a very long time to prepare, without adding sugar. After all, the fruits remain sour in any case. Of course, you can make a drink like cider without sugar, but not wine. Do not forget that the drink comes in different varieties: dessert, sweet, semi-sweet, dry. The amount of sugar added to it depends on what kind of wine you want to make. Of course, this also depends on how much fructose the fruit contains. If the apples are sweet, then less sugar is needed.
If you want to get dry homemade apple wine, the preparation of which is somewhat more complicated, then you need to add only 200 grams of sugar per liter of juice. If it’s dessert or sweet, then from 300 to 400. Do not exceed the specified standards. Otherwise, you will end up with a cloying drink.
Main process: fermentation
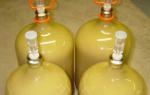
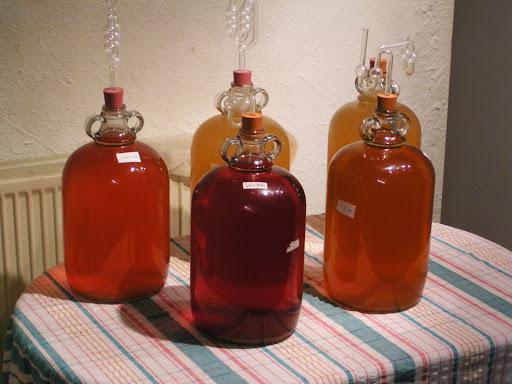
Making apple wine at home is a complex process. When fermentation begins, contact of the wort with air should be avoided. Otherwise, you won’t end up with wine, but you should use airtight containers to make a tasty drink. In this case, jars and bottles are ideal.
Particular attention should be paid to the removal of carbon dioxide. It is released during the fermentation process. In this case, it is necessary to install a water seal. To do this, you need to make a small hole in the lid of the container with juice. Insert a tube into it, the end of which should be installed in the bottle so that it does not become clogged with foam. And the second one is placed in a jar of water. Such a system will make it possible to freely remove all gases formed inside the container with wine. This will also prevent air from entering the container.
If you are preparing apple wine without yeast, then instead of such a complex system, you can put an ordinary medical glove on the neck of the container with raw materials, having previously made small holes in it in your fingers. If this option is not suitable, then it is worth purchasing a special water seal lid.

Making wine: basic rules
The container should be filled with wort only 4/5 of the entire volume. Free space is needed for foam and gases. After this, the container should be tightly closed with a lid and covered with plasticine.
During the fermentation period, the bottle of wine should be placed in a dark room. The temperature should be at least 18°. The optimal temperature is from 20 to 22°. At this stage, the container should not be opened and the wort should not be shaken. The fermentation period is usually 30-45 days. You can determine readiness by how often gas bubbles come out in a glass of water. If they have been gone for a long time, then your apple wine, which took a little over a month to prepare, is ready. The drink should sit a little longer, literally a couple of days.
Wine maturation
Of course, the young can already be consumed. However, it is worth considering that the drink will have a slightly harsh aroma and taste. But this can be fixed. The wine should just sit.

To do this, take a dry, clean, sealed container. It is important that there is no yeast on the walls of the vessel. To do this, wash the container thoroughly and dry it with a hairdryer. Using a straw, the wine should be carefully poured into another container. To begin with, you should merge the upper light layers, gradually moving to the lower ones. The procedure should be carried out carefully so that sediment does not rise from the bottom. After the container is completely filled with wine, it must be closed (hermetically). Store the poured product in a cool place where the temperature does not rise above 16° and does not fall below 10° for a long time: from 60 to 120 days. As a result, your drink will fully ripen and acquire a unique taste and aroma.
After aging, the wine has a strength of 12 to 16 degrees. This drink has the aroma of ripe apples and a dark amber hue. You can enjoy it. Your wine is completely ready!
For amateur winemakers who do not have access to a large amount of good grapes, I recommend making wine from apples according to the recipe published below. The result is a very tasty and healthy drink in moderate quantities with a strength of 10-12 degrees. I will prove that making apple wine at home is easier than you think.
Any varieties of green, yellow and red apples (summer and winter) are suitable for winemaking, the main thing is that the fruits themselves are ripe and as juicy as possible. It is allowed to mix different varieties, getting interesting blends, for example, sour apples with sweeter ones.
Ingredients:
- apples - 20 kg;
- sugar - 150-400 grams per liter of juice.
Adding water is advisable only when using unripe, very sour apples (the taste of the juice stings the tongue strongly). But even in this case, the acidity is reduced with a small amount of water - up to 100 ml per liter of juice, and not diluted in a ratio of one to two or one to three.
Apple wine recipe
1. Preparing apples. Do not wash apples picked from the tree or collected on the ground, since the yeast that is needed for fermentation lives on the peel. If the apples are very dirty, they can be wiped with a dry cloth or lightly brushed with a clean shoe brush.
To avoid bitterness in the finished homemade wine, I advise you to remove the seeds and core from the apples, and cut out the rotten parts, spoiled and moldy parts of damaged fruits.
2. Getting juice. The method of processing apples depends on the available equipment. If you have a juicer, I recommend using this particular kitchen tool. The result will be pure juice with a minimal amount of pulp, which will simplify further preparation.
If you don’t have a juicer, you can use a mechanical grater. The applesauce will then have to be squeezed out in a different way. For example, with gauze (a very labor-intensive process) or with a press. In any case, the minimum task is to get at least a liquid puree as a result.
3. Juice settling. Place the resulting apple juice (or liquid puree) in an open container with a wide neck (large pan or barrel) for 2-3 days, tying the top with gauze to protect against insects. During this time, wild yeast spores will get into the mixture, and it will begin to decompose into two fractions - pulp (remains of peel, pulp) and regular apple juice. The pulp will accumulate on top of the juice. In order for the yeast to get directly inside, you need to stir the contents of the container 3-4 times a day for the first 2 days with a clean hand or a wooden stick.
On the third day, the pulp will form a dense layer on the surface; it should be removed with a saucepan or colander. Only juice and a small (3-5 mm) film should remain in the container. The stage is considered complete when foam, hissing and a characteristic vinegar-alcohol smell appear in the wort, indicating that fermentation has begun.
4. Adding sugar. The amount depends on the initial sweetness of the fruit; the sweeter the juice, the less sugar is added to apple wine, especially at the initial stage. If the sugar content exceeds 20%, the wine will ferment poorly or fermentation will stop altogether. To prevent this from happening, it is better to add sugar in parts rather than pour it all at once.
Total amount: to obtain dry apple wine, I recommend adding 150-220 grams of sugar per 1 liter of fermented juice, the concentration for sweet and dessert varieties is 300-400 grams per liter. It is better not to exceed these standards, otherwise the wine will turn out cloying.
The first batch (100-150 grams per liter) is added immediately after removal from the pulp. Sugar is simply poured into the fermenting juice and stirred.
After 4-5 days, you can add a second portion (50-100 grams per liter). To do this, you need to remove the water seal, pour half as much wort into a separate container as you plan to add sugar (for example, for 500 grams you need 250 ml), add sugar to the drained juice, and mix. Pour the resulting sugar syrup back into the container with the wine. Reinstall the water seal.
The procedure for adding sugar can be repeated 1-2 more times every 4-5 days using the technology described above, adding 30-80 grams per liter of juice.
5. Fermentation. First, it is necessary to exclude the possibility of contact of the wort with air. If you don't do this, you'll end up with vinegar instead of apple wine. I recommend using glass bottles, jars or plastic mineral water bottles as hermetically sealed containers.
Next, you need to take care of the removal of carbon dioxide, which will be released during the fermentation process. To do this, install a water seal. It is made as follows: make a small hole in the lid of the vessel into which to insert a small diameter tube (cambric). Place the end of the tube located in the vessel as high as possible so that it does not become clogged with foam. Lower the other end of the cambric into a glass of water by 2-3 cm. Now the gases inside the container will freely flow out, but air will not be able to enter the container with wine.
Alternative options are to put a medical glove on the jar with a small hole in your finger (made with a needle) or buy a special water seal lid.
 Classic water seal scheme
  Fermentation under the glove
  Factory water seal
 Fill the vessel with fermenting juice no more than 4/5 in height, since you need to leave some space for carbon dioxide and foam.
During fermentation, the container should be in a dark and warm place (18-25°C), the optimal temperature is 20-22 degrees. The fermentation process of apple wine lasts from 30 to 60 days. Its completion is determined by the long-term absence of gas bubbles in a glass of water (a deflated glove) and the appearance of sediment at the bottom.
Attention! If fermentation lasts longer than 55 days, to avoid a bitter aftertaste, the wine should be poured into another container without sediment at the bottom and the water seal should be installed again.
6. Maturation. The young apple wine obtained at the previous stage can already be drunk, but it has a pungent smell and taste. These shortcomings are eliminated with endurance.
You will need another absolutely clean and dry sealed container. Here it is important to exclude the possibility of foreign yeast entering, so I recommend washing the prepared vessel well with hot boiled water and then drying it with a hairdryer.
Using a water seal tube, pour the apple wine from one container to another. First, drain the upper, lightest layers, then move on to the lower ones, trying not to touch the sediment at the bottom. If desired, the filtered drink can be sweetened (add sugar to taste) or fortified (pour in 40% alcohol or vodka in an amount of 2-15% of the wine volume). Fixing promotes storage, but the taste becomes harsher.
Fill the vessel to the top with wine and seal it tightly. If sugar was added, it is better to keep it under a water seal for the first 7-10 days in case of re-fermentation. Store wine in a cool, dark place (6-16°C) for 60-120 days. This time is enough for it to fully ripen and improve its taste.
First, once every 10-15 days you need to remove the wine from the sediment by pouring it into another container. Over time, sediment will appear less frequently, then the frequency of filtration can also be reduced. Homemade apple wine is considered ready when sediment no longer falls or its amount is minimal. After this, the wine can be bottled and hermetically sealed.

The resulting drink is dark amber in color with the smell of ripe fruits. Strength – 10-12% (without fixing). Shelf life – up to 3 years when stored in a cool, dark place in hermetically sealed containers.
Making apple wine at home is quite easy. There are several recipes for homemade apple wine, this pleasant drink reminiscent of summer.
1
Imagine: there is a blizzard outside your window, frost draws icy patterns on the glass, and you smell of apples. Homemade cider will brighten up your long winter evenings.
Apple juice in a glass
However, you can drink homemade apple wine not only in winter. The main thing is to choose a recipe you like.
In a good year, the number of apples in the orchard often exceeds the ability to process them into jam or jam. You can make juice or compote. But apple wine is easier to store than juice. And it will allow you not to lose a bountiful harvest.
It is important to know!
The destructive effect on the brain is one of the most terrible consequences of the influence of alcoholic beverages on humans. Elena Malysheva: ALCOHOLISM CAN BE WON! Save your loved ones, they are in great danger!
2
The taste of the future wine depends on the type of apple. If you want the wine not to be sour, you need to choose late varieties, and collect already ripe apples. Some gardeners, on the contrary, prefer sour apple varieties. You can, of course, mix varieties in different proportions to achieve the desired taste.
Unwashed fruits are used to prepare the drink. In extreme cases, you can wipe them with a damp towel. Natural yeast found on the skin will be needed for the fermentation process.

Apple pieces without seeds
Apples must be peeled from seeds, internal scales and tails. Next you need to make the applesauce. To do this, you can use a meat grinder or juicer. Leave the puree in an open container for a day, stirring from time to time. The top part of the puree will turn into a dense crust that must be removed. After this, the puree should be left again for a day.
Then you need to squeeze out the soft part of the puree, add 150 g of water for every 1 liter to the resulting juice, as well as 250 g of granulated sugar. With these proportions you will get dry wine. If you want the wine to be stronger and sweeter, the amount of sugar should be increased to 300-400 g per 1 liter. You need to stir the juice thoroughly so that the sugar melts, and then pour it into a glass bottle. The cork must have a hole for the release of carbon dioxide, and it is necessary to provide for the release of the gas through the water, since when fermenting juice comes into contact with air, the result will not be wine, but apple cider vinegar.
The bottle should be stored at room temperature in the dark for about a month and a half. When carbon dioxide ceases to be released, this will mean that the wine is ready. If you cover the bottle with a glove, it will stop “voicing” and fall off.
Now comes the most difficult and responsible operation: the wine must be poured into another container to get rid of sediment. This can be done using a hose by placing a second vessel below the one containing the wine. In principle, you can drink wine. But if you let it sit for another couple of months, and then pour it back into a clean container without sediment, its taste will improve significantly.

Apple juice in cans
The wine this recipe suggests is true cider. This ancient drink comes from France. True, when preparing classic cider, no water is used; it is obtained by fermenting pure apple juice. Cider is very popular not only in France, but also in Spain, Germany and the USA.
In our country, cider appeared at the end of the 19th century and immediately appeared on the imperial table. Classic cider has a golden color; to make it, different varieties of apples are combined, of which no more than 1/4 should be sour. The cider ferments in oak barrels, but the result will be good in our glass jar. The taste of wine is very dependent on the varieties of apples, so you can experiment by making wine from different varieties.
3
You can also try a recipe that does not require added sugar. Then the wine will turn out to be no stronger than 7°, but it will quench your thirst well, especially if you drink it chilled.
To prepare cider using classical technology, you need to squeeze out the apple juice and leave it to settle in the dark at room temperature for a day. Then you should carefully pour the juice into a jar in which it will ferment. The main thing is not to disturb the sediment. Seal the jar hermetically with a medical glove and leave for a month in a dark place at room temperature. After a month, pour the fermented juice into a clean jar again and close tightly. Now it should be left in a cool room with a temperature of 10-12°C, but still in the dark, for 3-4 months. After time, the drink must be filtered and bottled.

Apple cider with cinnamon
Making fruit wines at home is almost as old a tradition as planting gardens. Delicious cherry, raspberry, blackberry, and grape wines, made with your own hands from your own fruits, are prepared in many families, and recipes are passed down from generation to generation. And of course, homemade apple wine takes pride of place among them. Apple is a very common fruit and has many varieties. Homemade apple wine also has a number of beneficial properties. It contains a lot of iodine and pectin, removes salts from the body and regulates the digestion process.
In addition to cider, there are other varieties of homemade apple wines.
4
Select 5 kg of good ripe apples without wormholes or bruises, wash them, remove the stems and cores and grind through a meat grinder. To the resulting puree you need to add 1 kg of granulated sugar and 50 g of well-washed, dried raisins from green grapes. If necessary, if the apples are not juicy enough, you can add 500 ml of water to the puree. The jar with the mixture should be kept at room temperature, covered with a medical glove, for 3 weeks.
Then the fermented juice must be drained by filtering through 3-4 layers of gauze. Place the remaining grounds on a thick cotton cloth and squeeze out. Add the resulting liquid to the fermented juice, add another half a glass of granulated sugar and close the lid tightly. The jar should be placed in a dark place for a week to ripen. After this, pour 75 ml of vodka into the wine, stir well and bottle the drink.

Apples and a bottle of wine
Drinking cider is done differently in different countries. In England, the recipe is the same, but it is drunk with ice, poured into tall glasses. In France they drink it like champagne. But not everywhere. At home, in Normandy, ceramic bowls are used for cider.
The Spaniards believe that it should be poured from a height of 60-100 cm in a thin stream. Then the drink is saturated with oxygen and foams, revealing shades of apple flavor.
You can make stronger wine from apples. Here is a simple and quick recipe.
You need to take 2 kg of ripe sweet apples without defects, wash them, peel them and put them through a juicer. Add 1 tbsp to the juice. l. yeast. As in previous cases, let the mixture ferment. When carbon dioxide ceases to be released, the wine must be filtered and bottled. The sweeter the apples were, the stronger the wine. It cannot be stored for a long time, so you will have to drink it without delay.
Sugar in wine can be replaced with honey, and instead of store-bought yeast, use homemade wine yeast.
To obtain such yeast, you can use raisins. 200 g of raisins should be poured with boiled water and left for four days. After this time, the starter can be used.
A good starter can also be made from ripe raspberries. 2 tbsp. unwashed berries should be mashed with 0.5 tbsp. granulated sugar, pour 1 tbsp. water. Leave the starter at room temperature for 3-4 days and use it within a week. Then it will deteriorate and will be unusable.
You can also make apple champagne from apples. Maybe someone will like this recipe. For 7 liters of water take 2.4 liters of juice and 1.5 tbsp. granulated sugar, as well as 0.75 liters of vodka.
To prepare champagne you will need a deep container. You need to pour the juice into it, mix the water with sugar and cook the syrup. Cook it over low heat for an hour. Then the syrup needs to be cooled and poured warm into a container with juice. Leave the resulting mixture in a cool place for a week. Then add vodka to the container, carefully seal it and put it in a cool place, for example in a cellar, for 3-4 months. You will certainly appreciate the light, slightly sweet taste of fragrant champagne.
When the apples are ripe, have no doubt - you will succeed! Choose a recipe to suit your taste and get to work. Something different will suit every home, every family. It is not customary to drink cider to the bottom. You have to leave a little bit because sediment collects at the bottom. Probably, this rule can be extended to other apple wines.
And a little about secrets...
Russian scientists from the Department of Biotechnology have created a drug that can help treat alcoholism in just 1 month. The main difference between the drug is ITS 100% NATURAL, which means it is effective and safe for life:- Eliminates psychological cravings
- Eliminates breakdowns and depression
- Protects liver cells from damage
- Helps you recover from heavy drinking in 24 HOURS
- COMPLETE RIDGE from alcoholism, regardless of stage!
- Very affordable price.. only 990 rubles!
How to make delicious homemade wine from fresh apples? Wine is an enjoyable drink that not only tastes great, but can also have health benefits when consumed in moderation. How to make apple wine at home? This popular drink can be prepared from several ingredients, including: apples, grapes and berries.
You should start making wine by squeezing the juice. Remember that apples cannot be washed. Their peel contains a huge amount of yeast useful for fermentation.
Dirty or damaged apples simply need to be wiped and the rotten surface removed. To prevent the wine from turning out bitter, it is necessary to remove the core from the apples.
How to make delicious apple wine using a simple homemade recipe:
MORE .
The apples are peeled - start processing them. If you have a good juicer at home, it is best to use it. It will clean the juice as much as possible from the pulp.
Instead of a juicer, you can use a powerful mechanical grater. The resulting product must be squeezed out and then placed in a wide-necked container for 2-3 days.
During this period, the applesauce is divided into juice and pulp. The pulp forms on top of the juice. It is dense, so the puree must be stirred 2-3 times during the first 2 days. On the third day, the pulp is left alone, and at the end of the period, removed using a colander.
It's time to add sugar. The amount of sugar you add depends entirely on how strong you want your apple wine to be. If you want to get fortified wine, add 250 grams per 1 liter of wine. Sahara. The more sugar, the stronger the drink. Apples themselves are sweet, so the main thing is not to overdo it with the amount of sugar.
The wine is ready for fermentation. Place the juice in a dish or container that can be sealed. Foam forms during the fermentation process, so the container should be 45% empty.
During fermentation, gases are formed; to release them, you need to make a small hole in the container and insert a thin tube into it. The outer end of the tube should be released 2-3 centimeters into a glass of water. Place the container in a cool place.
Throughout the entire fermentation period, gases escape into the glass. As soon as the gases have disappeared, the wine is ready. However, you should not open it right away. Let it brew.
On average, fermentation lasts from 1 to 1.5 months. The longer the aging, the tastier the wine. You can also add rowan or pear juice to apple wine. This will give it tartness. Now you know how to make delicious apple wine at home.
♦ VIDEO. STEP-BY-STEP RECIPES FOR BEGINNERS:
Making wine from apples- this is a very wise decision, especially if the harvest exceeded all your expectations. The main thing is not to bring the situation to the point of absurdity. In particular, on the Internet you may come across dubious advice on how to make wine from dried apples.
In fact, you will be told how to make yeast brew from apple crumbles diluted with water. In our opinion, you will win much more if you do not succumb to such provocations, but use the available dried fruits to prepare fragrant and tasty uzvar.
But, for the sake of completeness, Shake Up still suggests that you familiarize yourself with this recipe.
How to make wine from apples: a question of raw materials
The most difficult and crucial moment in our case is the issue of selecting wine materials and determining the amount of sugar. In principle, all known categories of apple varieties are suitable for our purposes: sour, sweet and sour, sweet and bitter (aka tart). However, there are subtleties and preferences here. So, to obtain a light table drink, it is advisable to use sweet and sour autumn-ripened fruits. If we are talking about strong table, dessert and liqueur wines, we should focus on sour and sweet and sour winter varieties; for example, make wine from Antonovka apples.
However, the highest aerobatics in apple winemaking is mixing different varieties. At the same time, to make the task easier, you can use classical proportions, proven over centuries:
- 37.5% sweet, 37.5% bitter, 25% sour;
- 40% sweet, 40% bitter, 20% sour;
- 25% sweet, 25% bitter, 50% sour;
- 25% sweet, 75% bitter;
- 66% sweet, 34% bitter;
- 66% moderately bitter, 34% sweet.
When preparing raw materials, the degree of fruit ripening should also be taken into account. So, if we are talking about summer varieties, then they can be put into use immediately after harvesting. Autumn varieties need to be kept in a dark place for 4-7 days to fully ripen. To achieve final ripeness, winter apples need to rest in a dry cellar for 3-4 weeks.
An equally important issue is the proportional calculation of sugar and apple juice. It depends both on the level of acidity of the fruit and on the type of drink planned for the output. Experienced experts in garden winemaking recommend adhering to the following ratios:
- Light table wines – 150-200 g of sugar per 1 liter of juice;
- Strong table wines – 200-250 g of sugar per 1 liter of juice;
- Dessert wines – 300-350 g of sugar per 1 liter of juice;
- Liqueur wines - 400 g of sugar per 1 liter of juice.
If your harvest consists mainly of sweet fruits, then in order to avoid too much sugar content (and, as is known, it should not exceed 20%), it is necessary to increase the acidity of the future wine by adding 10-20% of sloe or rowan juice.
Basic apple wine recipe
Before sealing the container with the drink sent for maturation, make sure that it is full to capacity. This precaution is necessary to ensure that the wine does not sour from contact with air. Otherwise, you will have to reluctantly process it into apple cider vinegar. The aging period of the drink ranges from 2 to 4 months, but it will be better if you wait up to six months. Wine ripening occurs in a cool, dark room at a temperature of 8-15°C. After which, if necessary, the drink is once again removed from the sediment, bottled and consumed.
Frozen apple wine
In principle, if necessary, you can make a quite passable drink from frozen apples. However, it should be borne in mind that as a result of freezing, the fruits will be less juicy, and in addition, they will lose wild yeast, which is so valuable in this case. Due to this, some changes will have to be made.
Firstly: apple juice, or rather applesauce obtained from defrosted apples, will need to be diluted with water in a 1:1 ratio.
Secondly: At the pre-fermentation stage, add a handful of unwashed raisins to the wort (200 g per 1 liter of liquid).
And thirdly: reduce the amount of added sugar to 100-150 g per 1 liter of wort.
Apple wine made from jam
If the apple jam prepared for the winter has become candied or fermented (but not sour) and the toad is trying to throw it away, try turning it into wine.
Cooking method
Well, and, of course, don’t expect stunning results. Let's face it, the drink you'll get is not for everyone.
A simple apple wine recipe
Ingredients
- Apples – 1 kg
- Sugar – 700 g
- Water – 2 l
- Cinnamon – 1 tbsp. l.
Cooking method
- Wash the apples, cut into small slices and pour into a container, add water and cinnamon and cook until the mass softens.
- Then rub the mass through a sieve and leave to ferment.
- After fermentation, strain and add sugar, let the wine settle and strain again.
- Pour the finished homemade wine into bottles and store in a cool place.
Apple and pear wine
Ingredients
- Apple juice – 10 l
- Pear juice – 1.5-2 cups
- Sugar – 2 kg
Cooking method
Apple wine with rowan juice for better clarification
Proportion: 9 parts apple, 1 part rowan juice.
Ingredients
- Apple juice – 6.3 l
- Rowan juice – 0.7 l
- Sugar – 2.5 kg sugar
- Water – 1.5 l
Cooking method
- To obtain the wort, you need to take apple (preferably from late varieties of apples) and rowan juices, add sugar and water.
- After thoroughly mixing the juices with water and dissolving the sugar, pour the wort into bottles and leave for fermentation.
- Fermentation lasts 7-10 days. The result is a wine with a strength of 5-11 degrees.
If you want to make the wine stronger (16 degrees), the wine needs to be alcoholized. For 10 liters of wine, take 0.5 liters of alcohol or 1 liter of vodka, distribute evenly among bottles, mix thoroughly until the wine has a uniform strength. Aging the wine for 5 days. After this, filter and bottle.
Alternative Apple Wine Recipe
Ingredients
- Apples – 1 kg
- Sugar – 1.5 kg
- Water – 4.5 l
- Cinnamon – 1 tbsp. l.
- Yeast – 20 g
- Lemon – 2 pcs.
Cooking method
- Wash the apples and cut them into small slices, pour boiling water over them and put the mixture under a press.
- Keep under pressure for 4 days, then strain and add lemon juice, cinnamon and yeast.
- Place the container in a dark place for fermentation. When the fermentation process is over, mix the mass and leave for 2-3 days.
- Then strain again and pour into a barrel. Homemade wine is kept in it for six months, and then bottled and stored in a cool place.
Dried apple wine
Ingredients
- Dried apples of sour and sweet varieties – 1 kg
- Sugar – 100 g
- Water – 1.73 l
- Yeast (preferably wine yeast) – 1 tsp.
- – 500 ml
Cooking method
- Take dried apples of sweet and sour varieties, put them in a wooden or enamel bowl, add hot water at 80–90 °C and leave for 24 hours (take 800 ml of water for 1 kg of apples).
- Then press the apples, pour the resulting liquid into a bottle, add 10% sugar syrup (for 1 liter of syrup, take 930 ml of water and 100 g of sugar) and yeast, close the bottle with a fermentation stopper and leave for fermentation.
- After 5–6 days, the wort can be alcoholized by adding 500 ml of 70° alcohol per 1 liter.
- Pour the mixture into a clean bottle, close it and let it brew for 3-5 days.
- Then carefully remove the wine from the sediment and leave it to mature in a tightly closed vessel for 6–8 months. At the same time, make one or two transfusions using a tube (depending on the amount of sediment).
- Remove the finished wine from the sediment, pour into bottles, seal and store in a cool place.
Found a mistake or have something to add? Select the text and press CTRL + ENTER or. Thank you for your contribution to the development of the site!